Function Friday #12: include code in your content with a custom shortcode

Every Friday, I’m sharing code snippets that I use to customize WordPress. Feedback/suggestions are always welcome! For more information, check out the first post in the series.
For a variety of reasons, WordPress will strip out a lot of code you may want to paste into a page or post, even if you’re on the Text tab. If the code you’re pasting has lots of line breaks to improve readability, you’ll also discover that WordPress will convert single line breaks to <br> tags and double line breaks to <p> tags.
For example, the block of code that MailChimp gives you to embed an email newsletter signup form looks like this:
<!-- Begin MailChimp Signup Form -->
<link href="//cdn-images.mailchimp.com/embedcode/classic-10_7.css" rel="stylesheet" type="text/css">
<style type="text/css">
#mc_embed_signup{background:#fff; clear:left; font:14px Helvetica,Arial,sans-serif; }
/* Add your own MailChimp form style overrides in your site stylesheet or in this style block.
We recommend moving this block and the preceding CSS link to the HEAD of your HTML file. */
</style>
<div id="mc_embed_signup">
<form action="//xxxx.us10.list-manage.com/subscribe/post?u=xxxx&id=xxxx" method="post" id="mc-embedded-subscribe-form" name="mc-embedded-subscribe-form" class="validate" target="_blank" novalidate>
<div id="mc_embed_signup_scroll">
<div class="indicates-required"><span class="asterisk">*</span> indicates required</div>
<div class="mc-field-group">
<label for="mce-EMAIL">Email Address <span class="asterisk">*</span>
</label>
<input type="email" value="" name="EMAIL" class="required email" id="mce-EMAIL">
</div>
<div id="mce-responses" class="clear">
<div class="response" id="mce-error-response" style="display:none"></div>
<div class="response" id="mce-success-response" style="display:none"></div>
</div> <!-- real people should not fill this in and expect good things - do not remove this or risk form bot signups-->
<div style="position: absolute; left: -5000px;" aria-hidden="true"><input type="text" name="x_xxxx_xxxx" tabindex="-1" value=""></div>
<div class="clear"><input type="submit" value="Subscribe" name="subscribe" id="mc-embedded-subscribe" class="button"></div>
</div>
</form>
</div>
<script type='text/javascript' src='//s3.amazonaws.com/downloads.mailchimp.com/js/mc-validate.js'></script><script type='text/javascript'>(function($) {window.fnames = new Array(); window.ftypes = new Array();fnames[0]='EMAIL';ftypes[0]='email';fnames[1]='FNAME';ftypes[1]='text';fnames[2]='LNAME';ftypes[2]='text';}(jQuery));var $mcj = jQuery.noConflict(true);</script>
<!--End mc_embed_signup-->
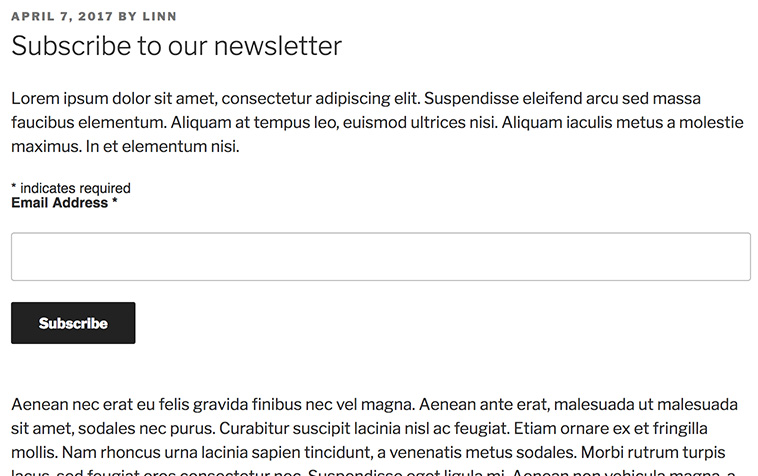
Pasting this into the Text editor has somewhat unexpected results:
To avoid having bits of your code stripped out, and/or extra line breaks inserted, you can add a custom field to hold code you want to include on the page.
If you don’t see the Custom Fields area while editing, click Screen Options in the top right corner and make sure the “Custom Fields” box is ticked.
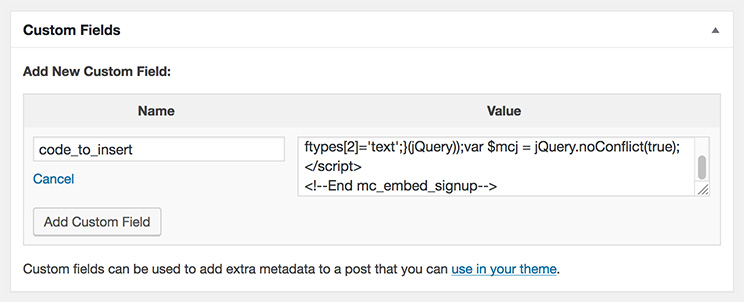
In the Name field, type code_to_insert. You might have to click “Enter new” first. Then paste the code you want to include in the Value field, and click the “Add Custom Field” button.
To now output the contents of that custom field within your page, rather than adding it to a page template (so it’s always before or after your content), you can create a custom shortcode.
The code
// Create shortcode for code_to_insert custom field
function drollic_insertcode_shortcode() {
    $code_to_insert = get_post_meta( get_the_ID(), 'code_to_insert', true );
    if ( $code_to_insert ) { // Check if the custom field has a value
        return $code_to_insert;
    }
}
add_shortcode( 'insertcode', 'drollic_insertcode_shortcode' );
This will create a shortcode called [insertcode], whose sole function is to take whatever is in the custom field and display it wherever the shortcode has been added.
For more complex shortcodes, I’ll use GenerateWP’s shortcode generator, but for such a simple shortcode with no attributes or content it’s fairly straightforward to code yourself. The drollic_insertcode_shortcode function retrieves the contents of the “code_to_insert” custom field from the current post/page as a string rather than an array, and stores it in a variable. If the variable contains anything, it will be output onto the page.
To call your shortcode something else – e.g. [add_my_code] – simply replace the first argument in the add_shortcode function on the last line. You do need to be aware of some of the shortcode naming limitations, however.
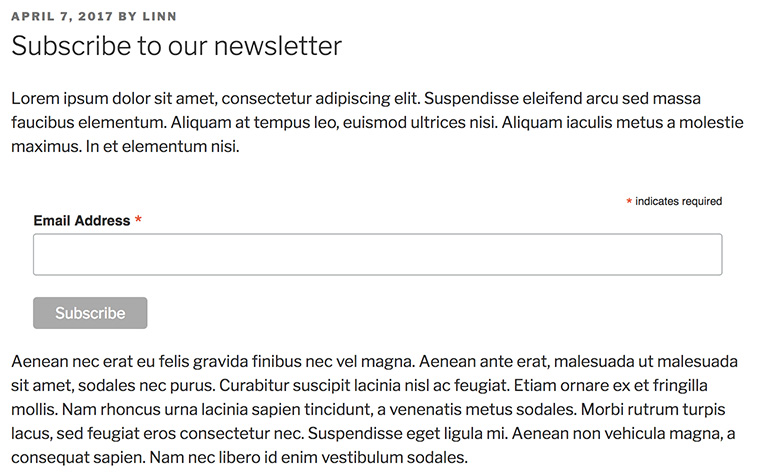
Inserting the code from MailChimp using this method, rather than pasting it directly into the editor, is much more successful:
To take this further, you could allow for multiple instances of the shortcode throughout the content.
You can already add several custom fields with the same Name and different Values, so you just need to modify the shortcode function slightly to select one of them at a time:
// Create shortcode for code_to_insert custom field
function drollic_insertcode_shortcode( $atts ) {
    // Attributes
    extract( shortcode_atts(
        array( 'id' => '0', ), $atts
    ));

    // Output
    $code_to_insert = get_post_meta( get_the_ID(), 'code_to_insert', false );
    if ( $code_to_insert[ $id ] ) { // Check if the custom field of this ID has a value
        return $code_to_insert[ $id ];
    }
}
add_shortcode( 'insertcode', 'drollic_insertcode_shortcode' );
This adds an attribute to the shortcode: id. It also asks for the custom field values as an array, rather than a string.
Now adding the shortcode [insertcode id=2] will return the third instance (if it exists) of the code_to_insert custom field value. Note that an ID of 2 returns the third value – not the second – because counting in code starts at 0.
Where does it go?
Since custom fields are part of WordPress core and are not theme-specific, this function works well in a functionality plugin. I discussed where to put your code more in depth in the first post in the series.
Resources
- Custom Fields in the WordPress Codex
- The Shortcode API in the WordPress Codex
- get_post_meta in the WordPress Code Reference
- extract in the PHP manual
- Using JavaScript in the WordPress Codex
Important security note
Making this change to your site means that users with limited permissions, such as Authors, can now insert page-altering code into a basic blog post. Depending on how your site’s users and roles are set up, you may want to restrict access to custom fields for users with less permissions.
Leave a Reply