Function Friday #2: custom typography styles in the Visual Editor
Every Friday, I’m sharing code snippets that I use to customize WordPress. Feedback/suggestions are always welcome! For more information, check out the first post in the series.
Continuing in the ease-of-use spirit of last week’s post, this code snippet will let you apply custom styles from your theme with the click of a button. You could switch to the Text (HTML) Editor and add classes manually, but it’s easy to forget the option exists if you have to edit the code every time.
The code
// Add Formats dropdown before Styles dropdown
function drollic_mce_editor_buttons( $buttons ) {
    array_unshift( $buttons, 'styleselect' );
    return $buttons;
}
add_filter( 'mce_buttons', 'drollic_mce_editor_buttons' );
This code inserts a new Formats dropdown, at the beginning of the toolbar’s first row of buttons:
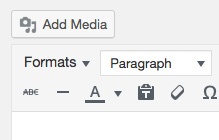
If you’d like to put the Formats dropdown on the second row of buttons instead, replace mce_buttons with mce_buttons_2 above. The Styles dropdown used to be on the second row of buttons, but in recent versions of WordPress it’s moved to the first row, so I think it makes sense to put your custom styles there too.
You can now replace the default Formats with your own custom typography:
// Populate Formats dropdown with custom styles
function drollic_mce_before_init( $settings ) {
    $style_formats = array(
        array(
            'title' => 'Button',
            'selector' => 'a',
            'classes' => 'button'
        ),
        array(
            'title' => 'Blockquote with background',
            'block' => 'blockquote',
            'classes' => 'highlight',
            'wrapper' => true
        ),
    );
    $settings['style_formats'] = json_encode( $style_formats );
    return $settings;
}
add_filter( 'tiny_mce_before_init', 'drollic_mce_before_init' );
This code adds two custom styles (which I’ve already defined in my theme’s stylesheet): a button class for links and an alternate style for blockquotes. The value for title will be what actually appears in the dropdown, so make sure it’s descriptive. The other values are from the TinyMCE format parameters. Here’s what the dropdown looks like now:
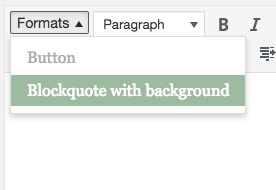
In the code above, the first style is called “Button”. It adds class=”button” to an existing link (<a>). Clicking “Button” in the Formats dropdown won’t actually create a link, so you need to make the link first, then highlight it and click “Button” to apply the style. That’s why “Button” appears greyed out in the screenshot above – I need to create and select a link first to enable that style.
The second style is called “Blockquote with background”. It creates a blockquote with a special class (<blockquote class=”highlight”>), or if you select an existing blockquote and then click “Blockquote with large text” in the Formats dropdown, it will simply add class=”highlight” to the existing blockquote.
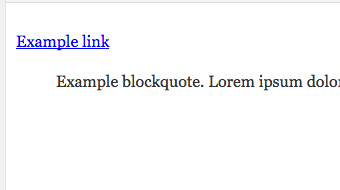
A final touch is to duplicate the relevant CSS from your theme’s stylesheet in a custom Visual Editor stylesheet. If you don’t do this, the only way you’ll be able to tell the styles have been applied is by switching to the Text (HTML) Editor:
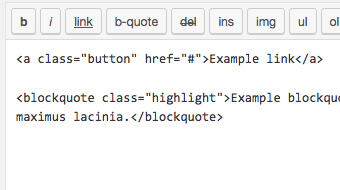
In the Visual Editor, they’ll just look like normal links and blockquotes:
The first step is create a CSS file to load in the Visual Editor. You can name it whatever and put it wherever you’d like, but the default is to put a file called editor-style.css in your main theme folder. Here’s what mine looks like to enable the above two styles:
/* Button */
#tinymce a.button {
    background: #0599a9;
    color: #ffffff;
    display: inline-block;
    padding: .5em;
    text-decoration: none;
    vertical-align: top;
}
#tinymce a:hover.button, #tinymce a:active.button, #tinymce a:focus.button {
    background: #035a64;
}
/* Blockquote */
#tinymce blockquote.highlight {
    background: #0599a9;
    color: #ffffff;
    font-family: Bitter, Georgia, serif;
    font-size: 1.5em;
    margin-left: 0;
    padding: 1em;
}
Finally, you need to enqueue the stylesheet you just made:
// Add editor style
function drollic_editor_styles() {
    add_editor_style( array( 'editor-style.css', 'https://fonts.googleapis.com/css?family=Bitter' ) );
}
add_action( 'admin_init', 'drollic_editor_styles' );
Because my blockquote style uses a Google font, I’ve also enqueued the relevant stylesheet here. If you named your stylesheet something else and/or put it in a subfolder, you need to change editor-style.css above to reflect the filename and location of your stylesheet, e.g. css/my-editor-styles.css.
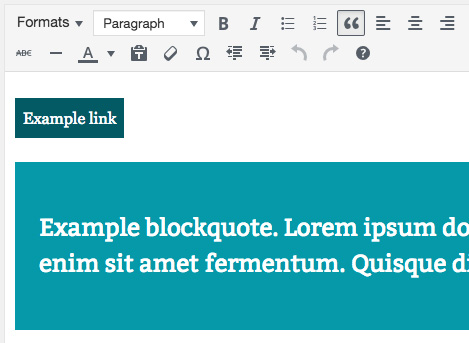
Here’s the Visual Editor again, with editor-style.css doing its job (in this screenshot, the link/button is being hovered over):
As always, remember to add a unique prefix to your function names (like I’ve done with drollic) to avoid plugin/core conflicts.
Where does it go?
Because these styles are from the theme, I’ll include all of these functions in the theme’s functions.php file. For more thoughts on where to put your code, read the first Function Friday post.
Resources
- TinyMCE Custom Styles in the WordPress Codex
- TinyMCE format parameters in the TinyMCE docs
- array_unshift in the PHP manual
- add_editor_style function in the WordPress Code Reference

This is my favourite post so far, Linn!
I’ve been setting up editor style sheets forever, but somehow didn’t know about the formats option. Super handy for giving clients more styling options … I’m using this already.
That’s so awesome to hear!